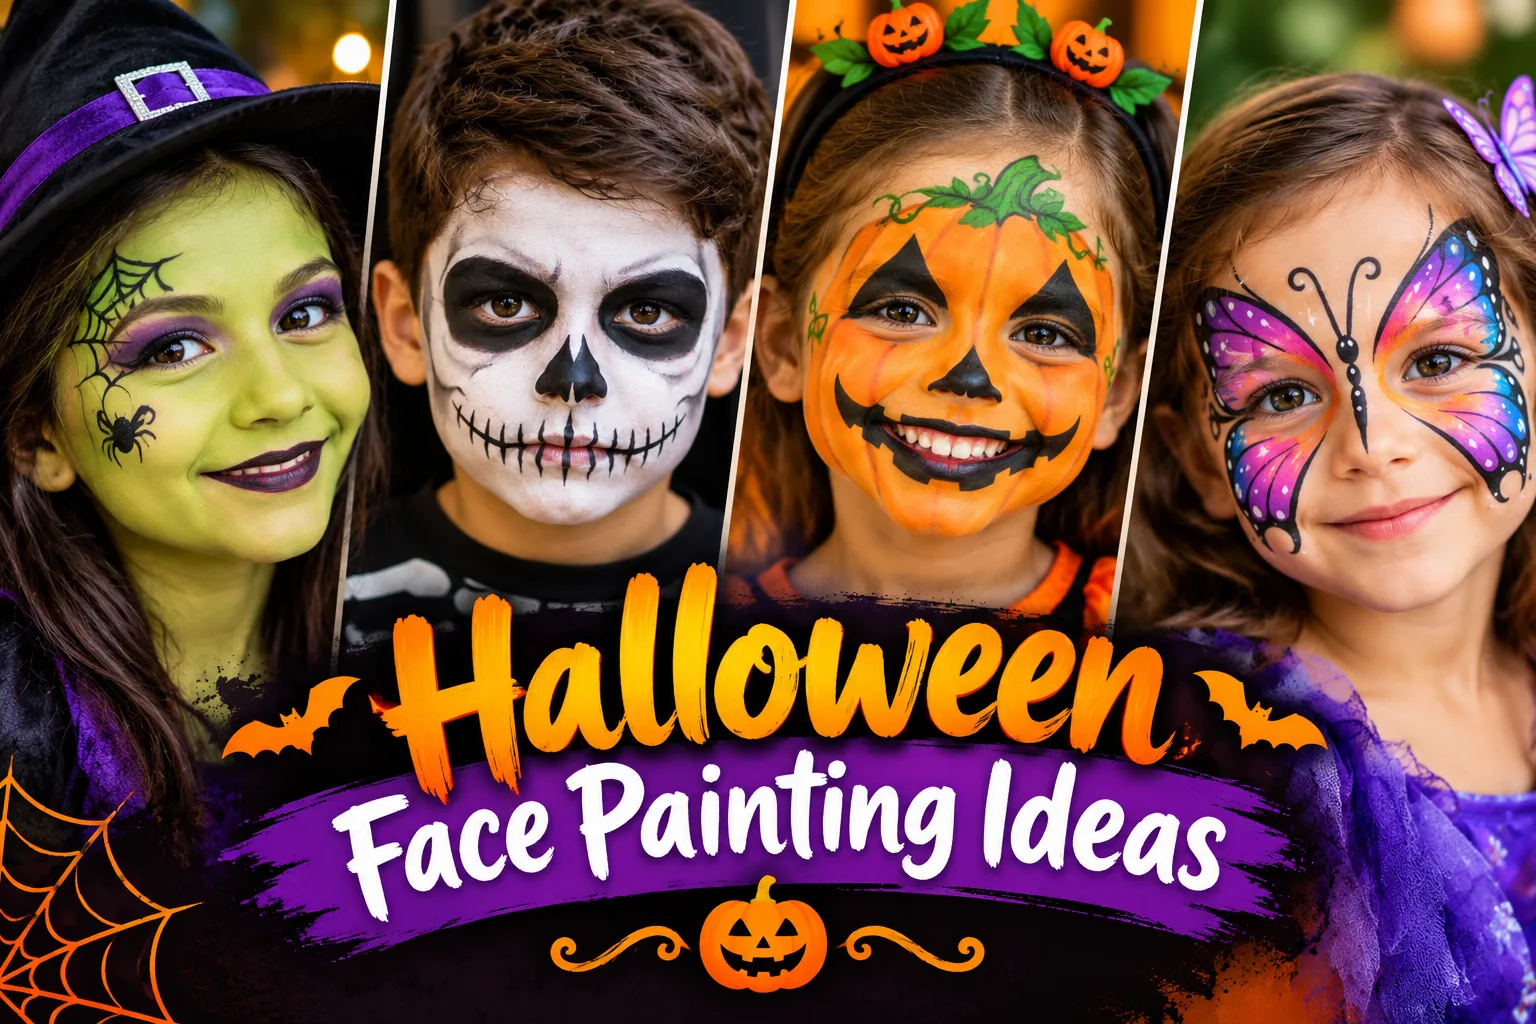
Halloween is the perfect time to experiment with creative makeup, spooky costumes, and eye-catching face art. Whether you are preparing for a Halloween party, a school celebration, a family gathering, or a trick-or-treating adventure, the right face paint can make your costume stand out. From adorable pumpkins and friendly ghosts to scary skulls and mysterious vampires, there are countless Halloween face painting ideas to suit every age and style.
You do not need professional makeup skills to create an impressive Halloween look. With a few face paints, some brushes, a sponge, and a little patience, you can transform an ordinary appearance into something fun and memorable. Simple designs are ideal for beginners, while detailed artistic patterns can help experienced face painters showcase their creativity.
In this guide, you will discover easy Halloween face painting ideas for kids and adults, cute designs for beginners, scary looks for horror lovers, and useful tips for creating a beautiful finish. Whether you prefer something playful or frightening, these ideas will help you find the perfect Halloween face paint design.
1. Classic Pumpkin Face Painting
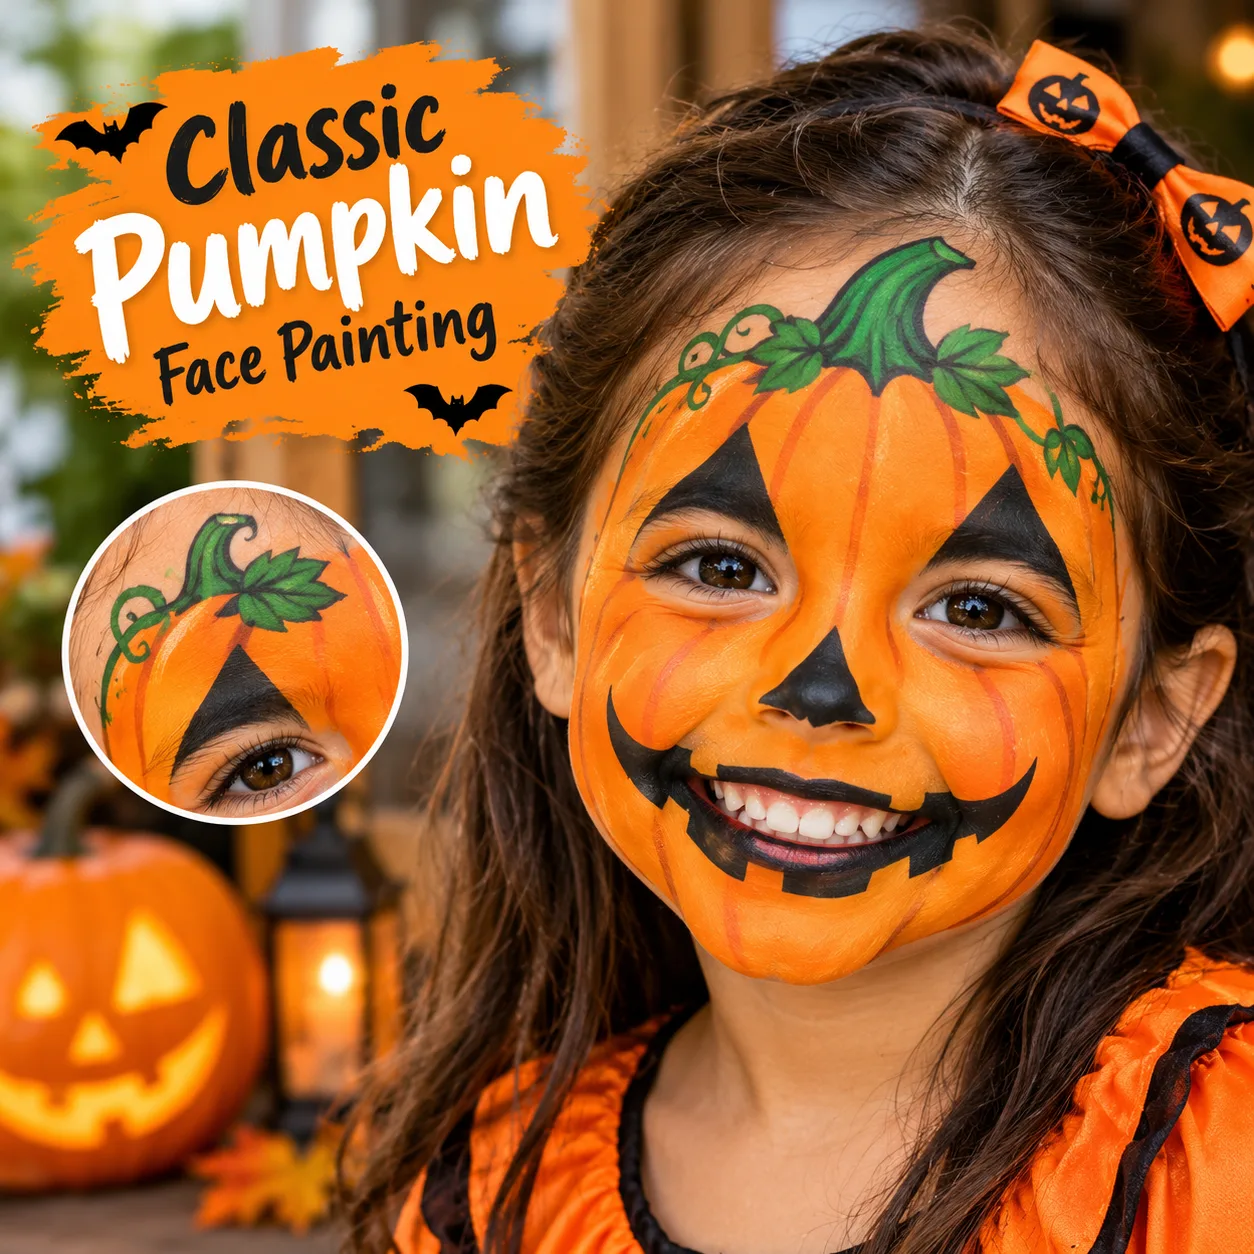
Pumpkin face painting is one of the most popular choices for Halloween. Its bright orange colour, dark outlines, and playful expression make it suitable for children and adults alike. This design works particularly well for school events, family celebrations, and Halloween costume parties.
Start by applying orange face paint to the cheeks and forehead, creating a rounded pumpkin shape. Use black paint to draw triangular eyes, a small triangular nose, and a smiling or jagged mouth. Add a little green paint above the forehead to create a pumpkin stem with small leaves. You can also use darker orange shades to create curved lines that resemble the natural ridges of a pumpkin.
For young children, choose a friendly pumpkin face with rounded eyes and a gentle smile. Adults can create a more dramatic version by adding darker shading around the eyes and a cracked pumpkin effect near the mouth.
Pair this design with an orange outfit, a pumpkin costume, or a simple black dress for a coordinated Halloween appearance. Since the design relies on basic shapes, it is an excellent starting point for beginners.
2. Cute Ghost Face Painting
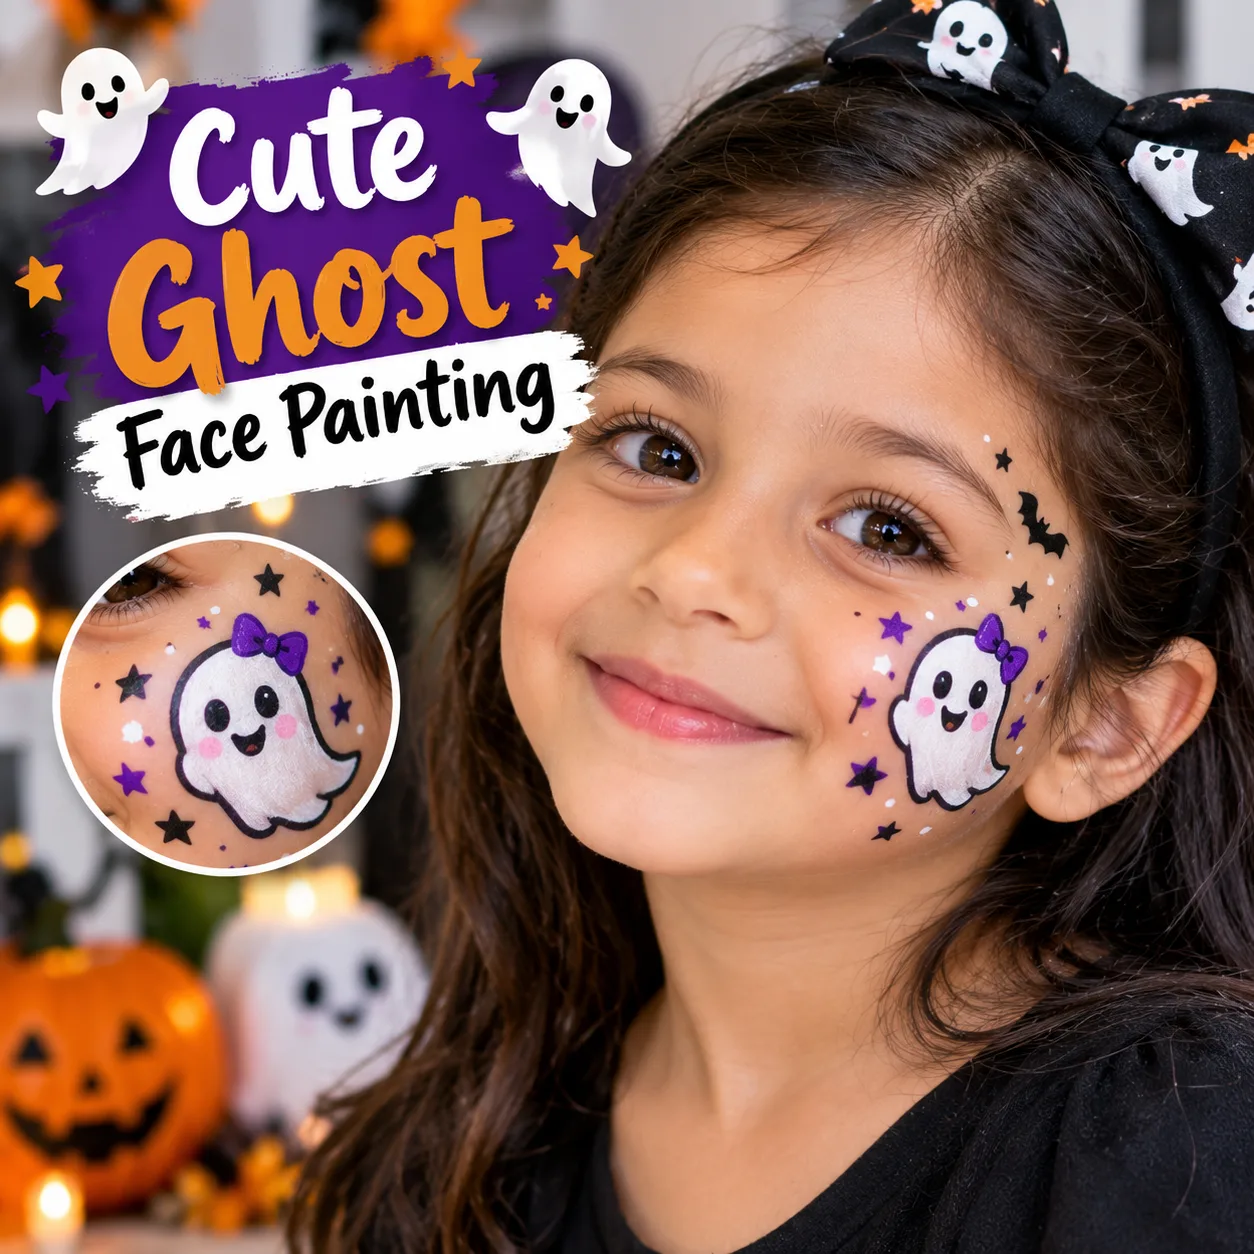
A ghost is another timeless Halloween symbol that can be transformed into a cute and charming face painting design. Unlike frightening horror makeup, a friendly ghost look is perfect for toddlers, young children, and anyone who prefers a playful Halloween style.
Apply white face paint to create a small ghost shape on one cheek or across the forehead. Give the ghost two black oval eyes and a tiny mouth. To make the design more interesting, add little pink cheeks, a small bow, or a few stars around the ghost.
If you want a slightly spookier look, use pale grey shading around the edges and add dark shadows beneath the eyes. You can also paint several tiny ghosts around the temples and cheeks to create a miniature Halloween scene.
This design does not require complicated techniques. A small brush and a sponge are usually enough to create a neat result. Combine the ghost face paint with a white outfit, a ghost costume, or a black-and-white Halloween dress.
3. Scary Skull Face Painting
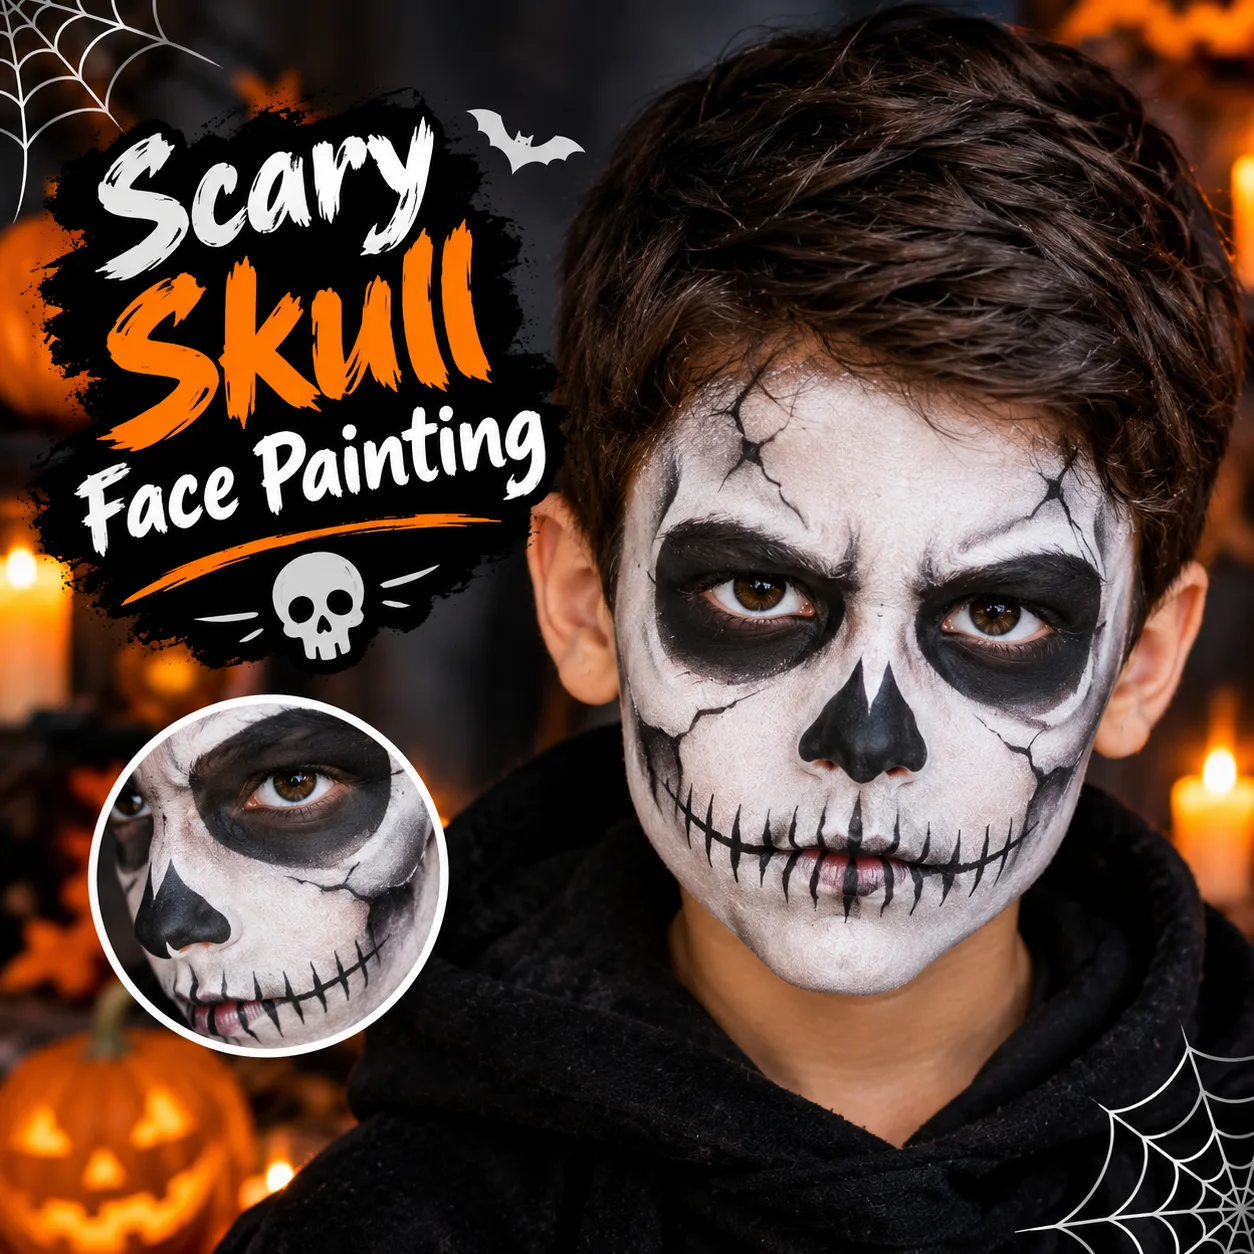
Skull face painting is an excellent option for people who enjoy darker Halloween themes. It can look frightening, dramatic, and artistic, depending on the details you choose. Although a full skull design requires more time than simple face painting, you can create an impressive version with a few basic steps.
Begin with a white base covering the face, leaving the eye area ready for dark shading. Use black paint around the eyes to create large, hollow-looking sockets. Add a dark triangular shape around the nose and draw thin vertical lines over the lips to resemble teeth. Grey shading along the cheekbones can make the face appear more structured and realistic.
For a beginner-friendly version, focus on the white base, dark eyes, and simple teeth. Experienced face painters can add cracks, fine lines, and deeper shadows to create a more realistic skull effect.
A skull design works well with black clothing, a skeleton costume, or a dark hooded outfit. If you are painting a child’s face, consider a simplified skull with softer details instead of an extremely frightening appearance.
4. Vampire Face Painting
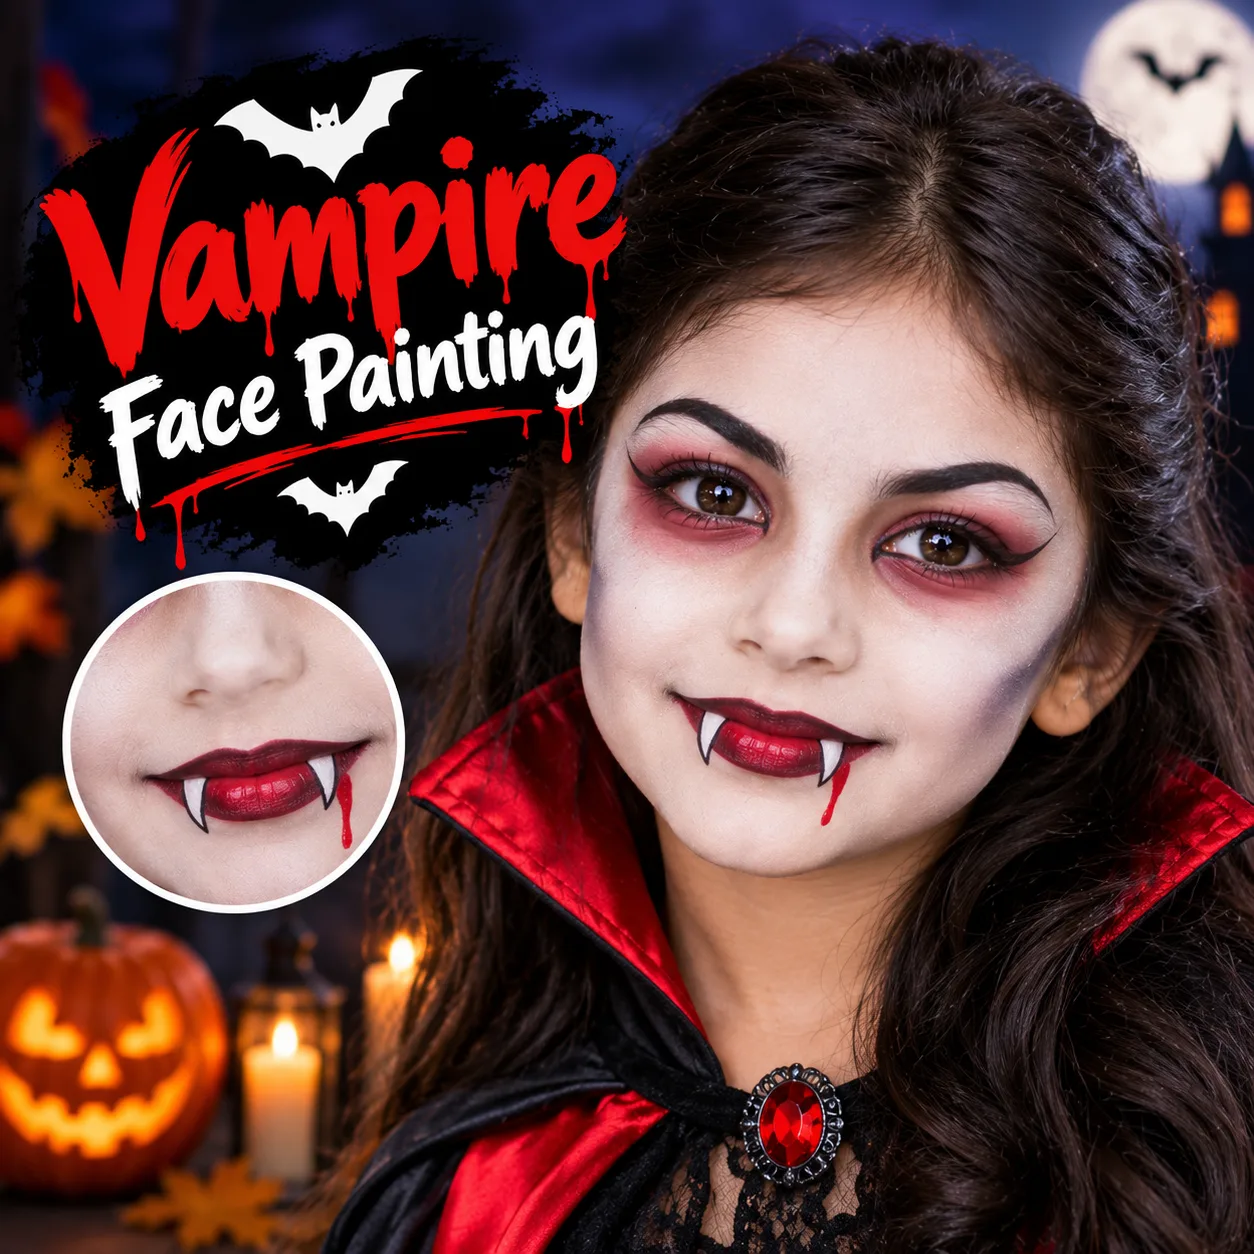
Vampire face painting is a stylish Halloween choice that combines pale skin, dramatic eyes, and classic horror details. It is especially suitable for people who want a mysterious look without covering their entire face in complicated artwork.
Start by applying a light base using face paint formulated for skin. Add subtle grey shading around the cheekbones and eyes. Use black or dark burgundy paint to define the eyebrows and create a dramatic appearance. Paint small red drops near one corner of the mouth to represent blood, and add two tiny fangs extending from the lips.
For a more elegant vampire look, concentrate on sharp eyebrows, dark eye details, and a deep red lip design. You can also add a little silver or purple shading around the eyes for a modern fantasy effect.
Children may prefer a friendly vampire design with small fangs and a smiling expression. Adults can choose a more dramatic version to complement a cape, black outfit, or classic vampire costume.
5. Cat Face Painting for Halloween
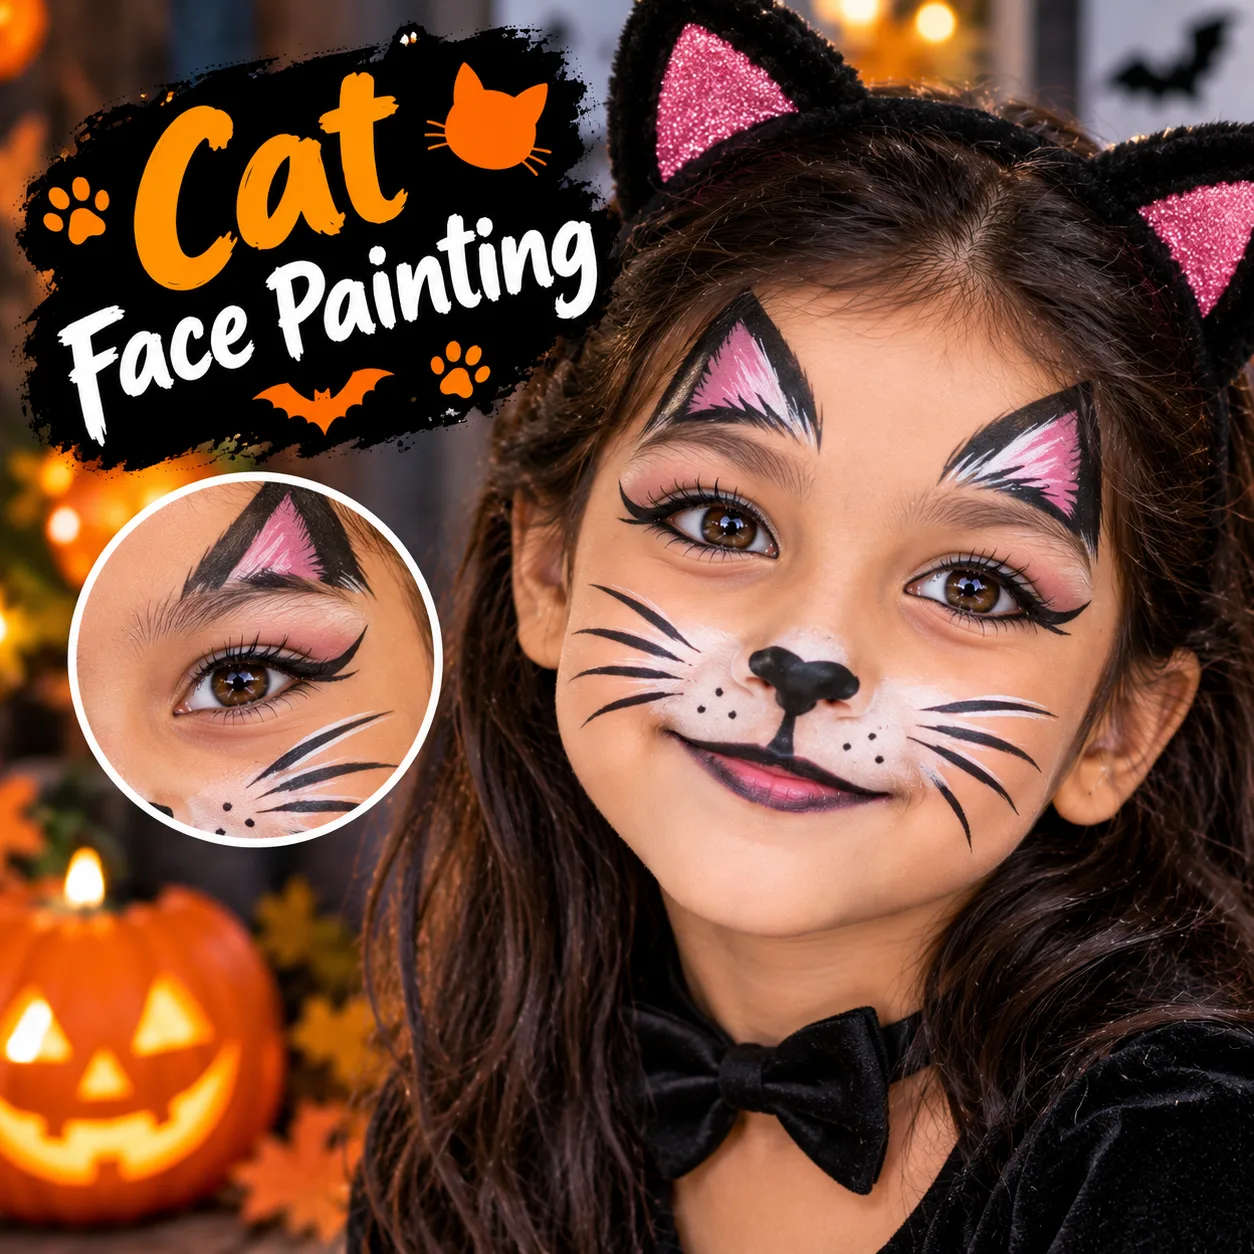
Cat face painting is one of the easiest Halloween designs for beginners. It is cute, versatile, and suitable for children, teenagers, and adults. You can create a simple black cat, a glamorous feline look, or a magical cat inspired by fantasy characters.
Begin by drawing a small black nose at the tip of the nose. Extend thin lines from the nose toward the cheeks to create whiskers. Add a few small dots on each side of the mouth and draw a curved line above the upper lip. Use black paint to create a subtle cat-eye effect around the eyes.
For a black cat design, add pointed shapes above the eyebrows to suggest ears. If you prefer a softer look, use brown, grey, or orange paint instead of black. Small white highlights can make the eyes and nose stand out.
You can also create a tiger-inspired cat design with orange cheeks, black stripes, and a white muzzle. This variation is ideal for people who want a colourful Halloween look rather than traditional spooky makeup.
Cat face painting pairs beautifully with cat ears, a matching headband, and a black outfit. Because the design uses simple lines and shapes, it is a great choice when you need a quick Halloween look.
6. Witch Face Painting Ideas
A witch is a classic Halloween character that offers plenty of room for creativity. You can choose a friendly witch design for children or a dramatic, mysterious appearance for an adult Halloween party.
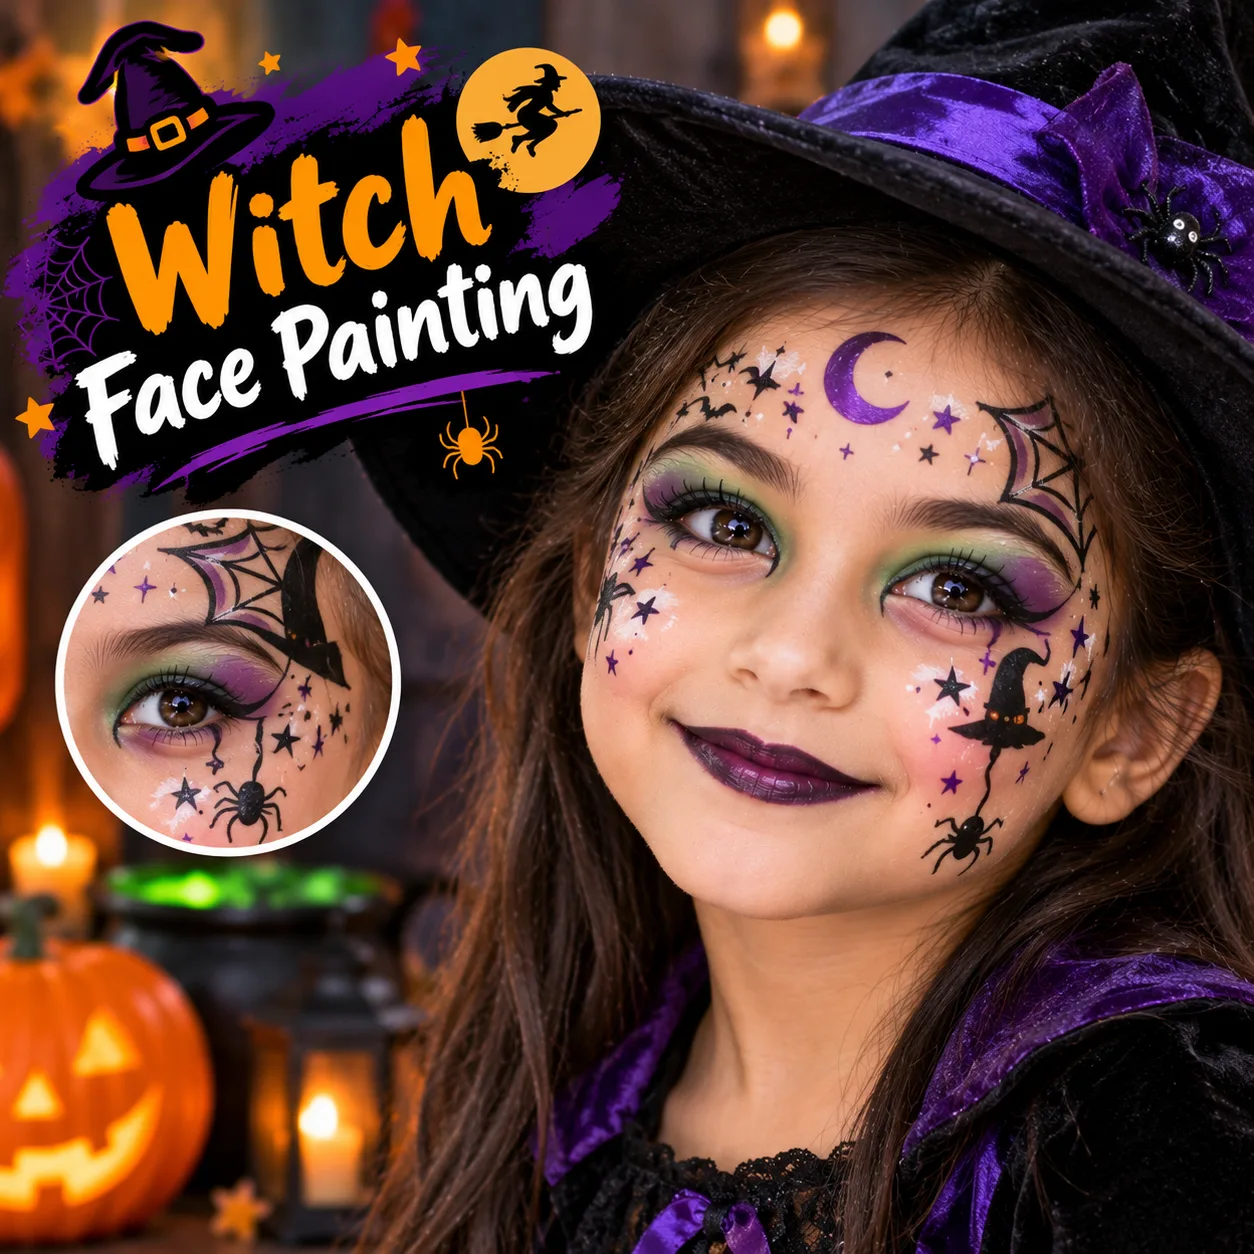
For a simple witch face, paint a small black spider, crescent moon, or star on one cheek. Add green shading around the eyes or create a small wart using a dark dot. Purple, green, and black are traditional colours that work well together.
For a more detailed design, create smoky-looking eyes with purple and black face paint. Draw tiny stars across the forehead and add a crescent moon near the temple. You can also paint delicate spiderweb lines extending from the outer corners of the eyes.
A friendly witch design can feature a smiling face, colourful stars, and a little green shading. A scarier version may include darker cheek contours, dramatic eyebrows, and shadowy details.
Complete the look with a pointed hat, a black dress, or a purple costume. If you are painting children, keep the design comfortable and avoid placing paint too close to the eyes.
7. Spiderweb Face Painting
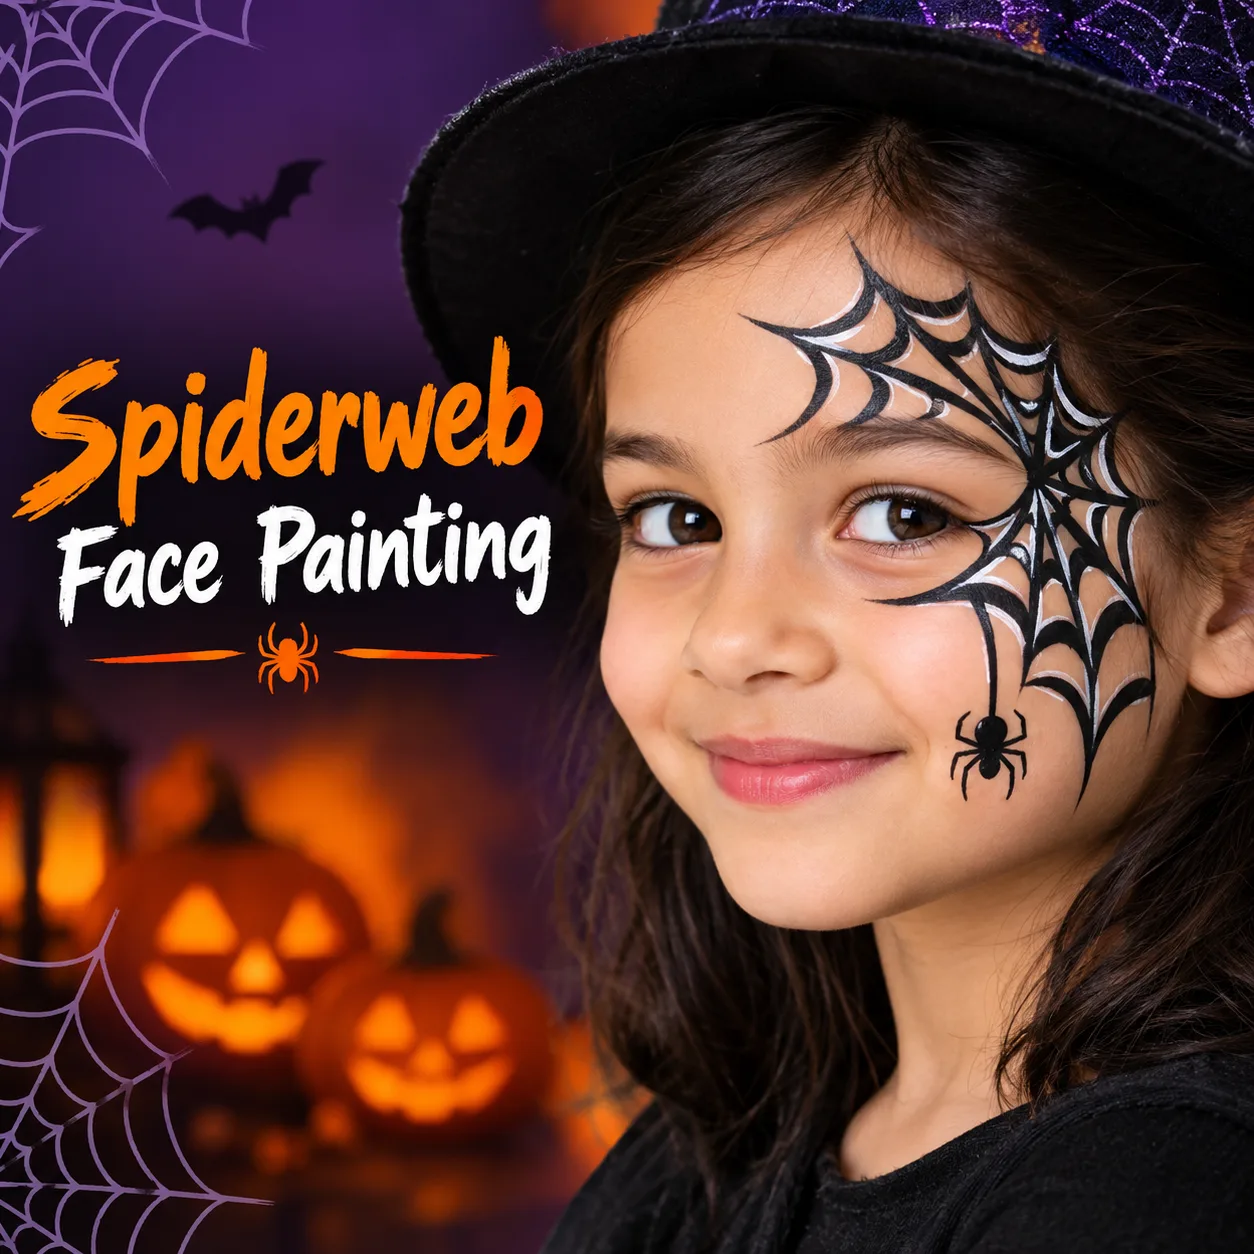
Spiderweb face painting is a simple yet effective choice for anyone looking for a spooky Halloween design. It works particularly well around the eyes, across the forehead, or along one cheek.
Use a fine brush to draw several thin black lines radiating outward from a central point. Connect these lines with small curved strokes to form a web. Begin with a few lines and gradually add the connecting sections to keep the pattern balanced.
You can paint a small spider hanging from the web for an extra Halloween touch. A tiny black spider with eight short legs is usually enough to complete the look. Add a few silver or purple dots around the web to create a magical effect.
For children, a small spiderweb on one cheek is often more comfortable than a large design covering the face. Adults can extend the web from the temple toward the forehead for a more dramatic appearance.
Spiderweb face painting looks great with black clothing, witch costumes, vampire outfits, and gothic-inspired Halloween styles. The design is also easy to customise with glitter products specifically approved for use on the face.
8. Butterfly Face Painting with a Halloween Twist
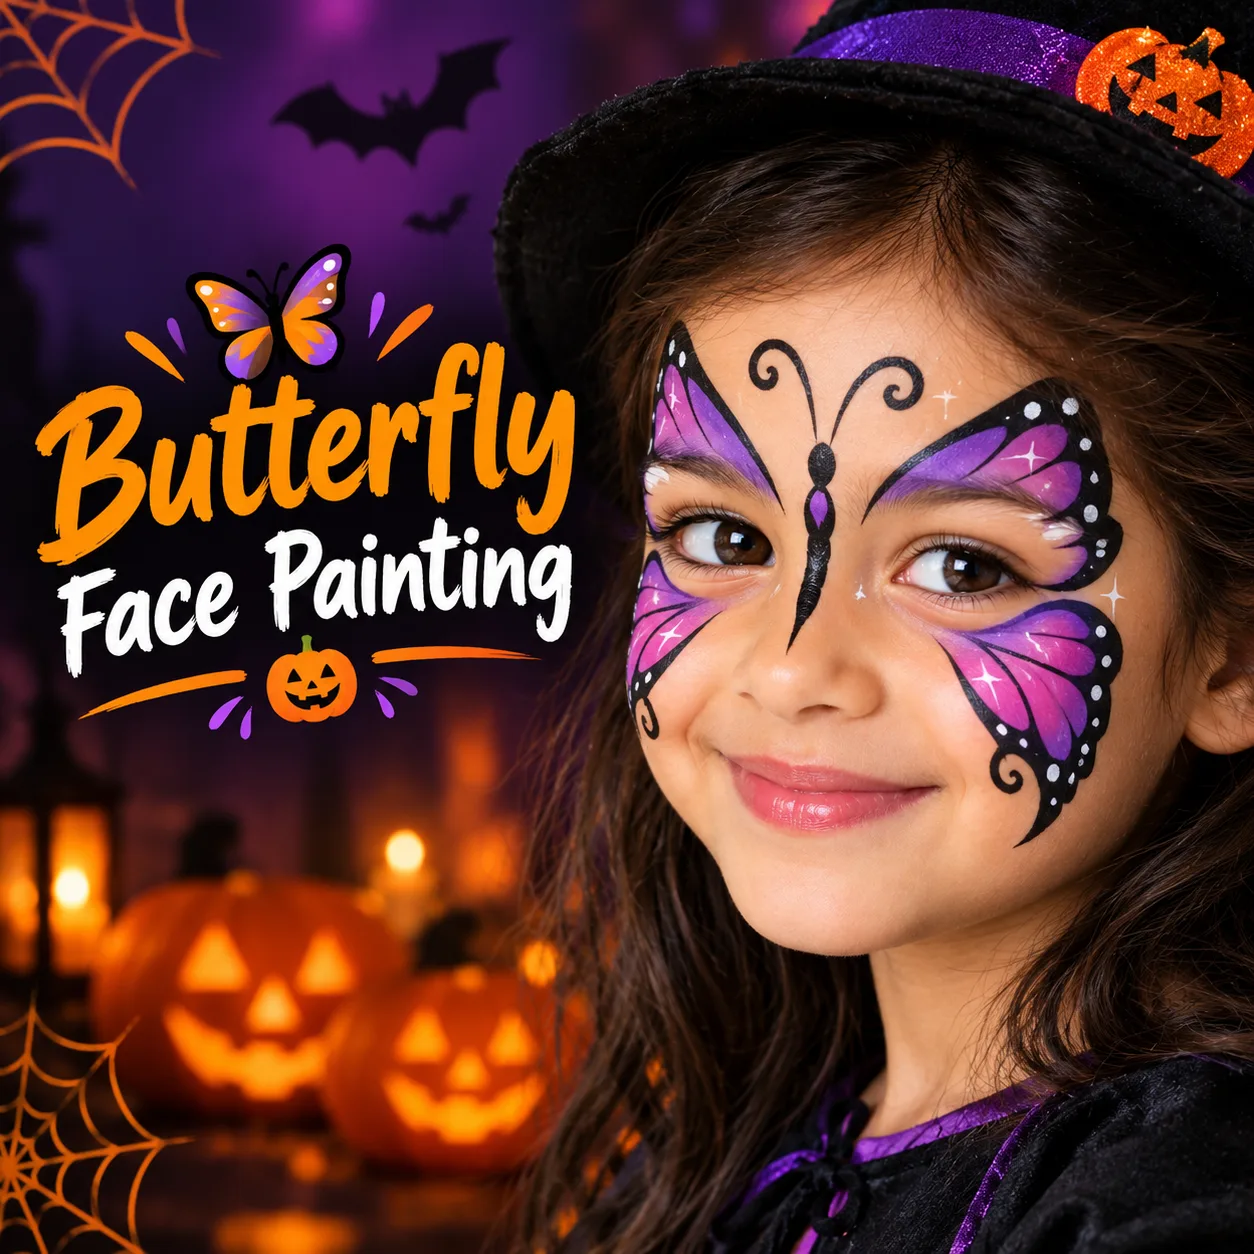
Butterfly face painting is usually associated with colourful celebrations, but it can also make a beautiful Halloween design. By using darker colours and unusual patterns, you can create a mysterious butterfly look that feels appropriate for the occasion.
Begin by sketching two large wings around the eyes, extending toward the temples and cheeks. Use purple, orange, black, or deep blue paint to fill the wings. Add black outlines and small decorative dots to define the edges.
To create a Halloween-inspired butterfly, include tiny bats, stars, crescent moons, or spiderweb details within the wings. A combination of orange and black can produce a pumpkin-inspired design, while purple and silver create a magical night-time effect.
For children, bright orange, pink, and purple shades can make the butterfly cheerful rather than frightening. Adults may prefer a darker colour palette with fine lines and dramatic wing shapes.
This design works particularly well for Halloween parties where costumes can be imaginative rather than strictly scary. Pair the face paint with butterfly wings, a black dress, or a colourful fantasy costume.
9. Zombie Face Painting
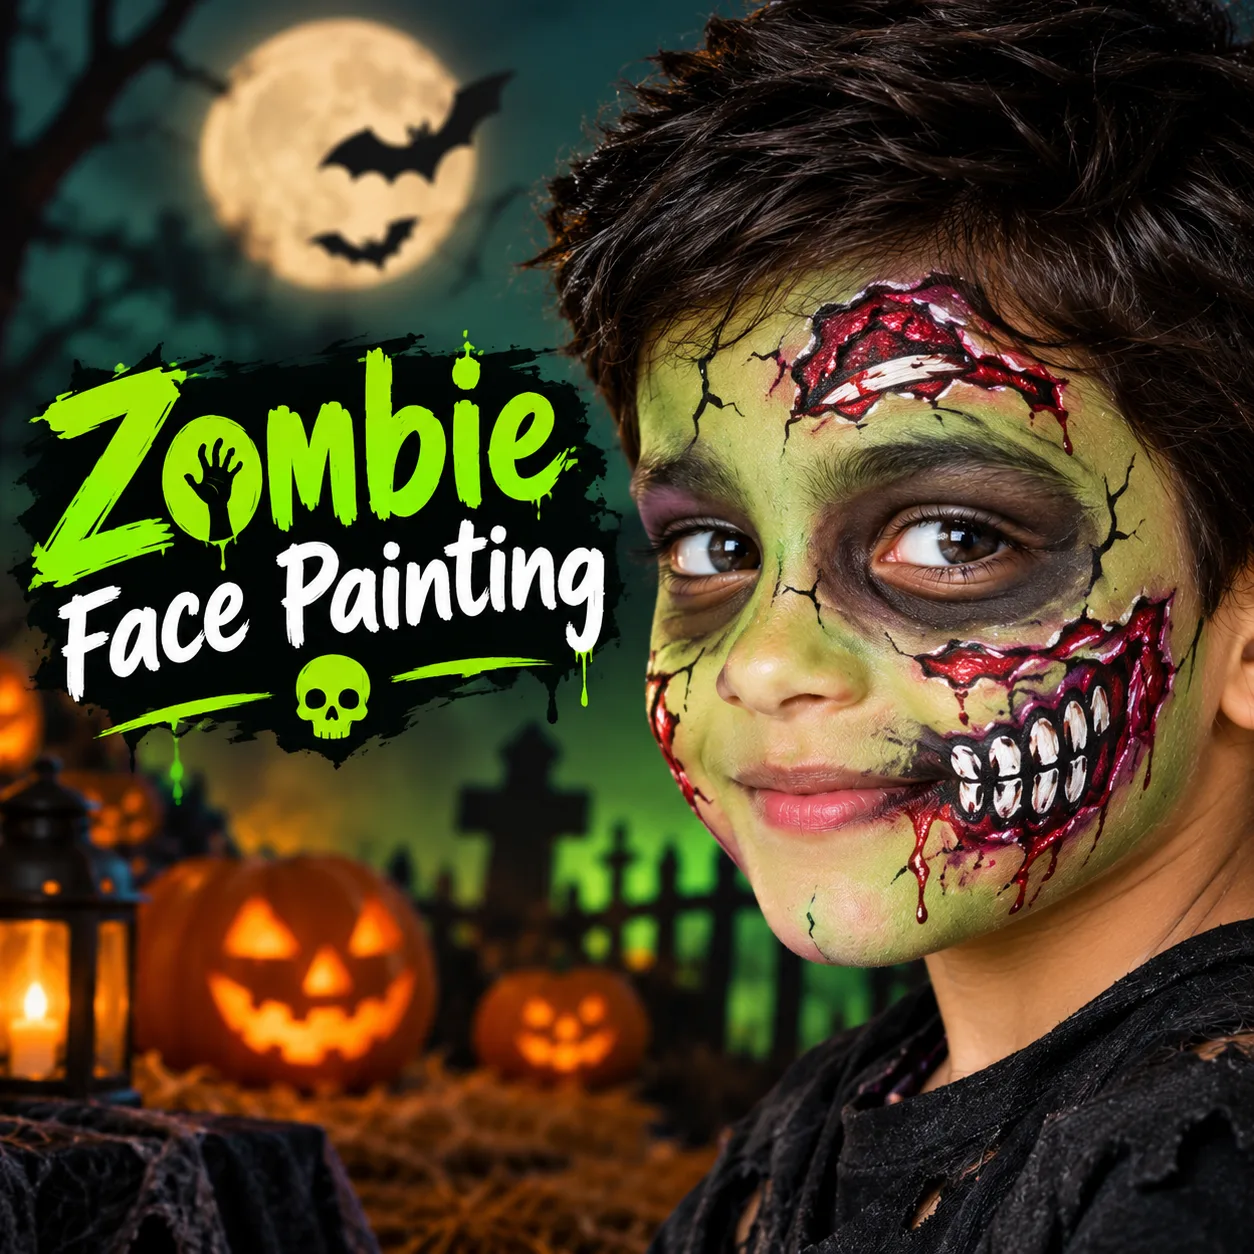
Zombie face painting is a popular choice for horror enthusiasts who want a frightening Halloween appearance. The key to this design is creating the impression of pale skin, darkened eyes, and uneven facial details.
Start with a pale grey or green base. Apply darker shades around the eyes, cheekbones, and temples to create a tired, hollow appearance. Use brown, grey, and muted purple tones to add depth around the cheeks.
Draw a few irregular lines to suggest cracks or damaged skin. You can also paint small stitches using black lines and short connecting marks. For a more dramatic effect, add red details using cosmetic products designed for skin application.
You do not need to cover the entire face to achieve a zombie look. Dark eyes, pale cheeks, and a few textured lines can be effective on their own. This makes the design easier to apply when time is limited.
Complete the appearance with old-looking clothing, a torn-style costume, or a simple dark outfit. For children, avoid realistic wounds or disturbing details if they prefer a less frightening version.
10. Half-Face Halloween Makeup
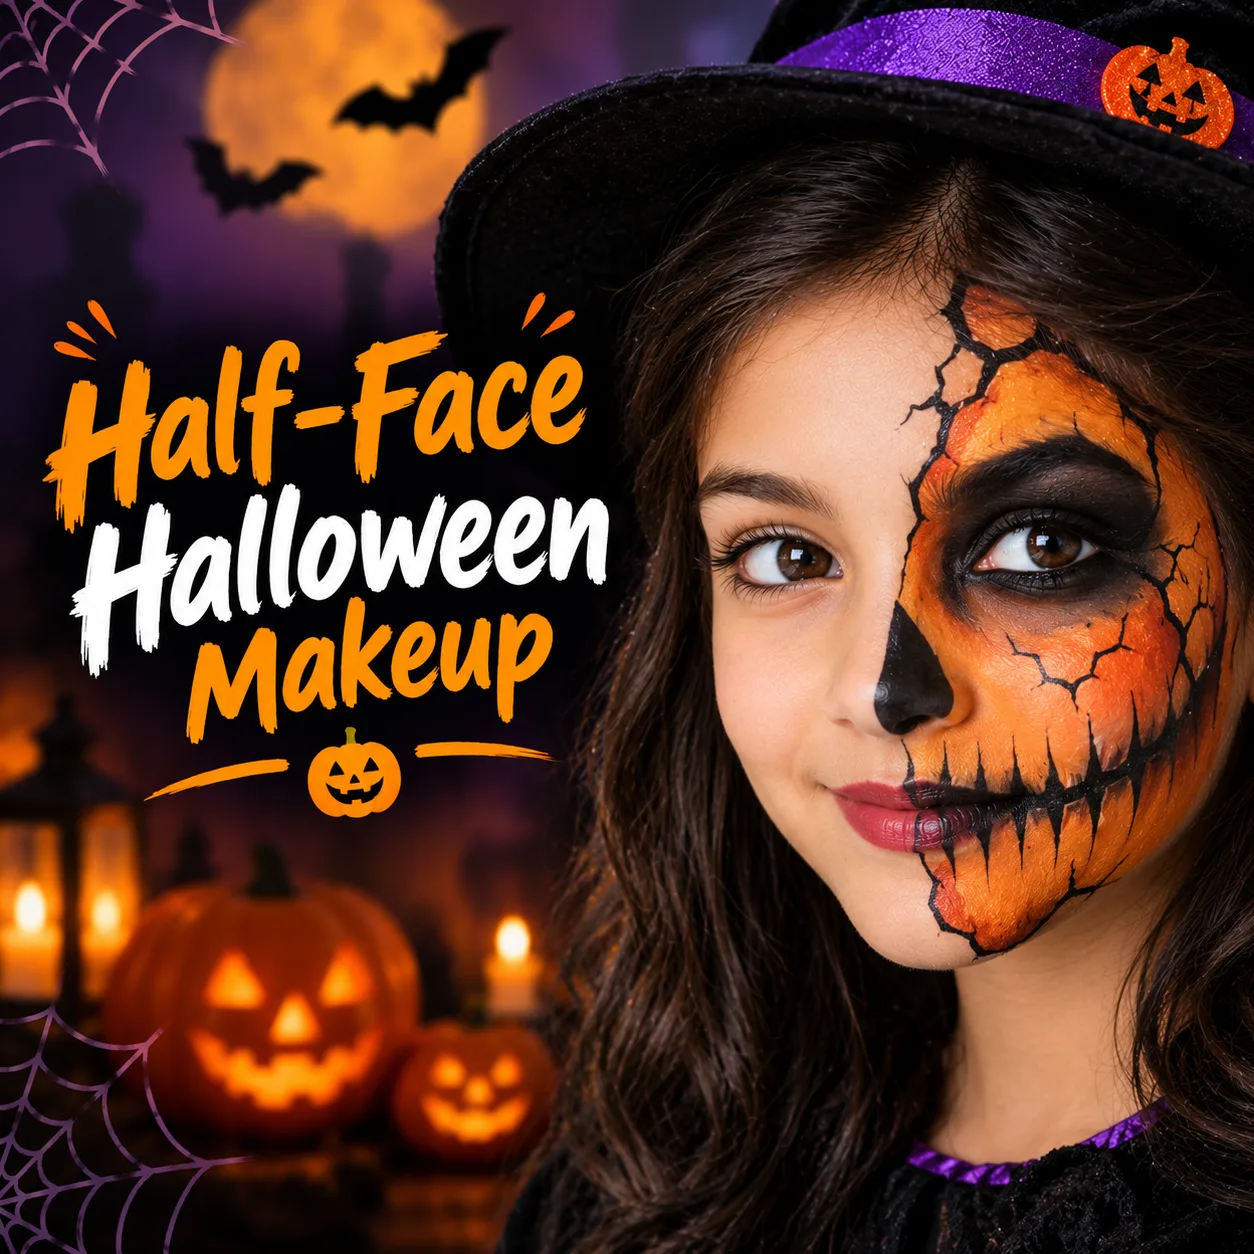
Half-face Halloween painting is a creative way to combine two contrasting looks in one design. One side of the face can remain relatively natural, while the other side becomes a pumpkin, skull, vampire, or other Halloween character.
To create a half-skull design, divide the face visually down the middle. Paint one side white, then add dark eye shading, a triangular nose, and teeth lines. Keep the other side simple or apply regular makeup for contrast.
You can also combine a cute cat on one side with a scary cat design on the other. Another option is to paint half the face as a friendly pumpkin and the other half as a cracked, spooky pumpkin.
The most important part of this design is creating a clear division between the two sides. Work slowly and use a fine brush to make the central line neat. Choose colours that complement each other so the finished look appears intentional.
Half-face painting is especially suitable for teenagers and adults who want something more artistic than a traditional Halloween design. It also looks striking in photographs because the contrast makes the details easy to see.
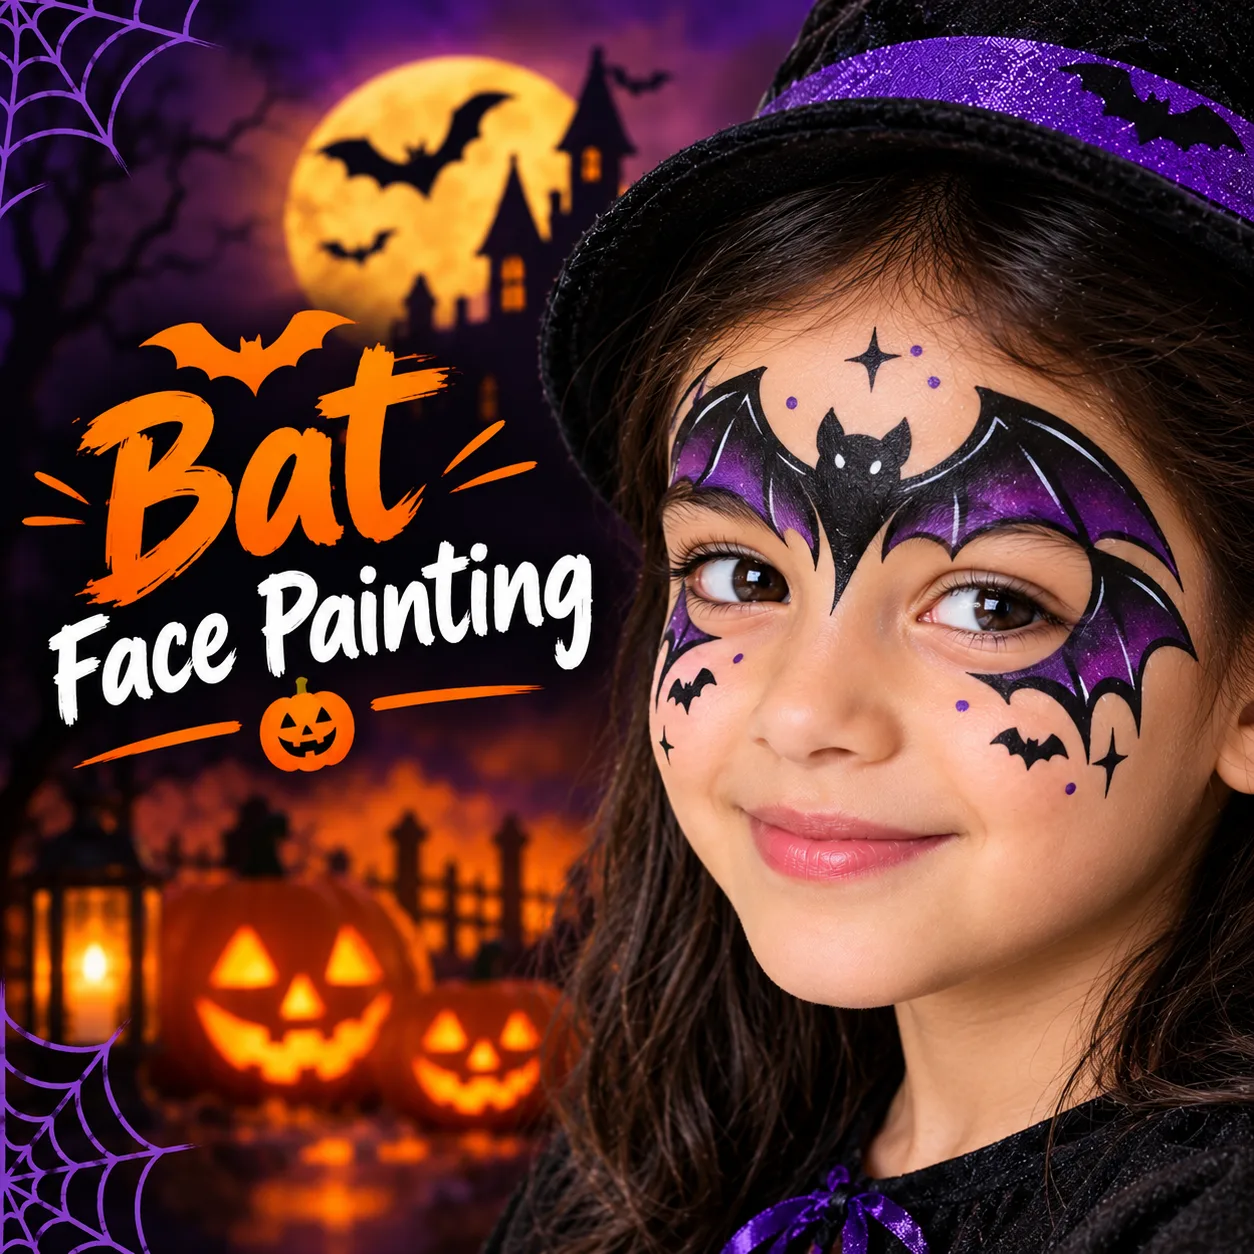
11. Bat Face Painting
Bats are instantly recognisable Halloween symbols, and their shapes make them easy to incorporate into face painting. A small bat painted across the forehead or near the eyes can create a fun design without requiring a complicated base.
Use black face paint to draw a simple central body with two angular wings. Add tiny pointed ears and small eyes if you want the bat to look more detailed. You can also paint several miniature bats flying across one cheek or along the forehead.
For a more colourful design, use purple or dark blue shading around the bat. A crescent moon and a few small stars can turn the artwork into a miniature Halloween night scene.
Children may enjoy a cute bat with large eyes and rounded wings, while adults can choose sharp outlines and darker shading. This design works well with vampire costumes, superhero-inspired outfits, and classic Halloween clothing.
12. Skeleton Face Painting for Kids
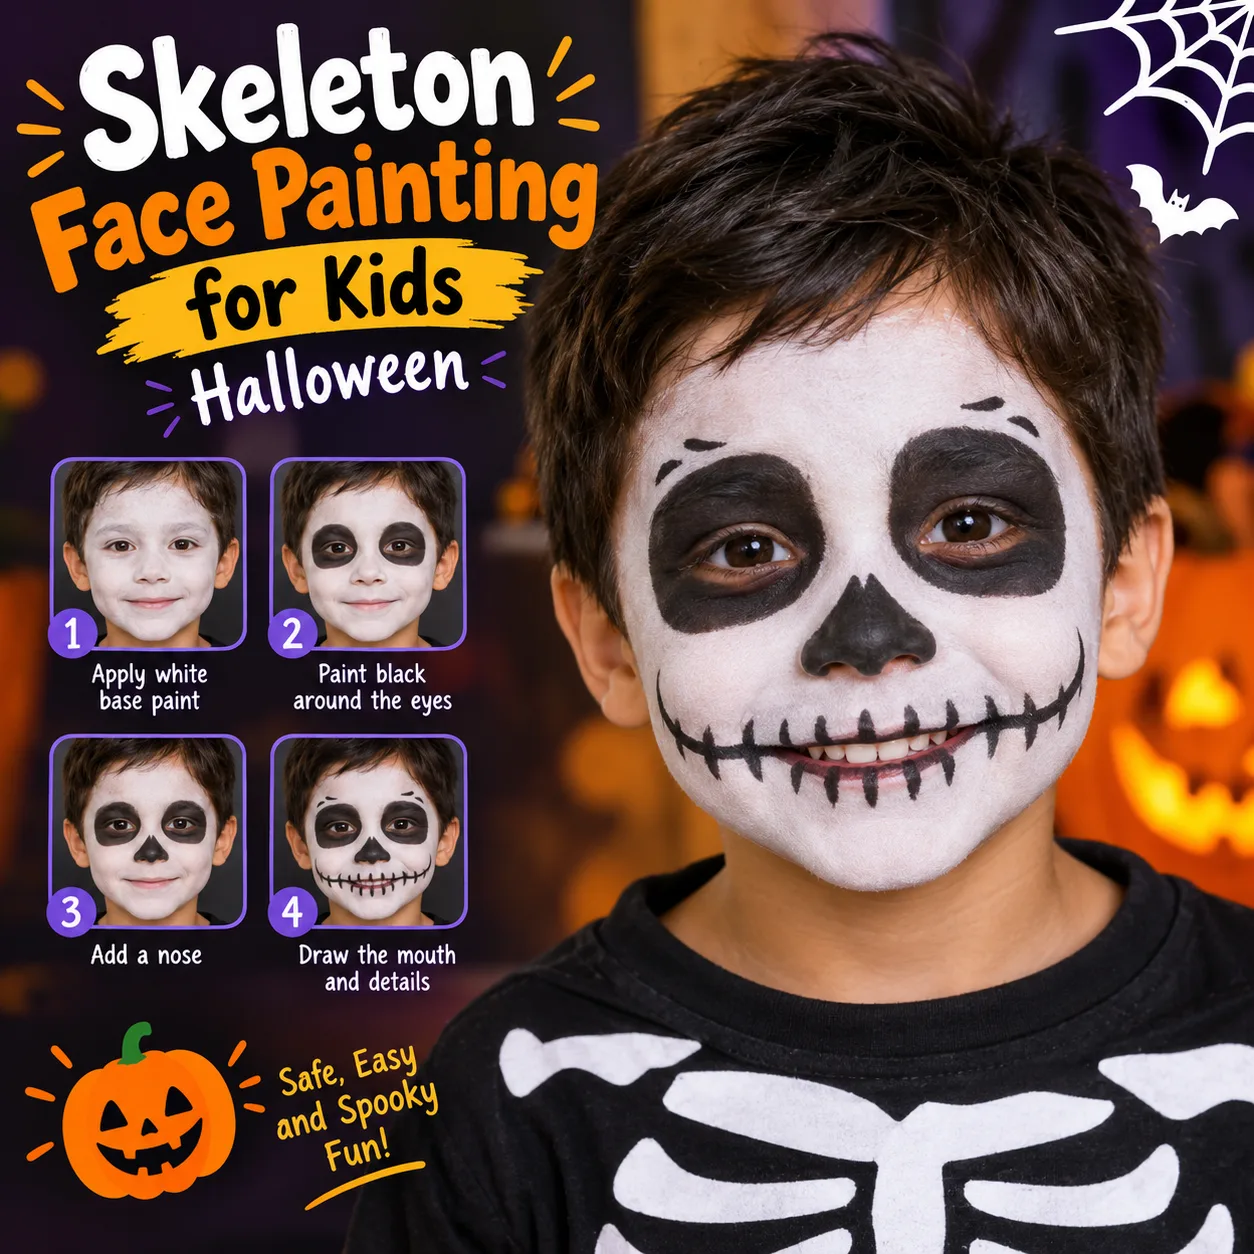
A simplified skeleton design is a practical choice for children who enjoy spooky costumes. It is easier to apply than a detailed skull and can be adjusted to suit different ages.
Start by painting small white areas around the mouth and cheeks. Add black lines to represent teeth and use dark paint around the eyes if the child is comfortable with it. You can also draw a few simple bone shapes along the cheeks or forehead.
For younger children, a small skeleton design on one cheek may be more comfortable than a full-face application. Older children can choose a larger design with additional details.
Keep the artwork simple and allow enough time for the paint to dry before putting on the costume. Avoid applying paint directly to the eyelids or too close to the eyes.
A black-and-white skeleton design looks effective with a skeleton costume, a black T-shirt, or a simple monochrome outfit. It is a good choice for school Halloween celebrations because it is recognisable without requiring extensive makeup.
13. Glitter and Magical Halloween Face Painting
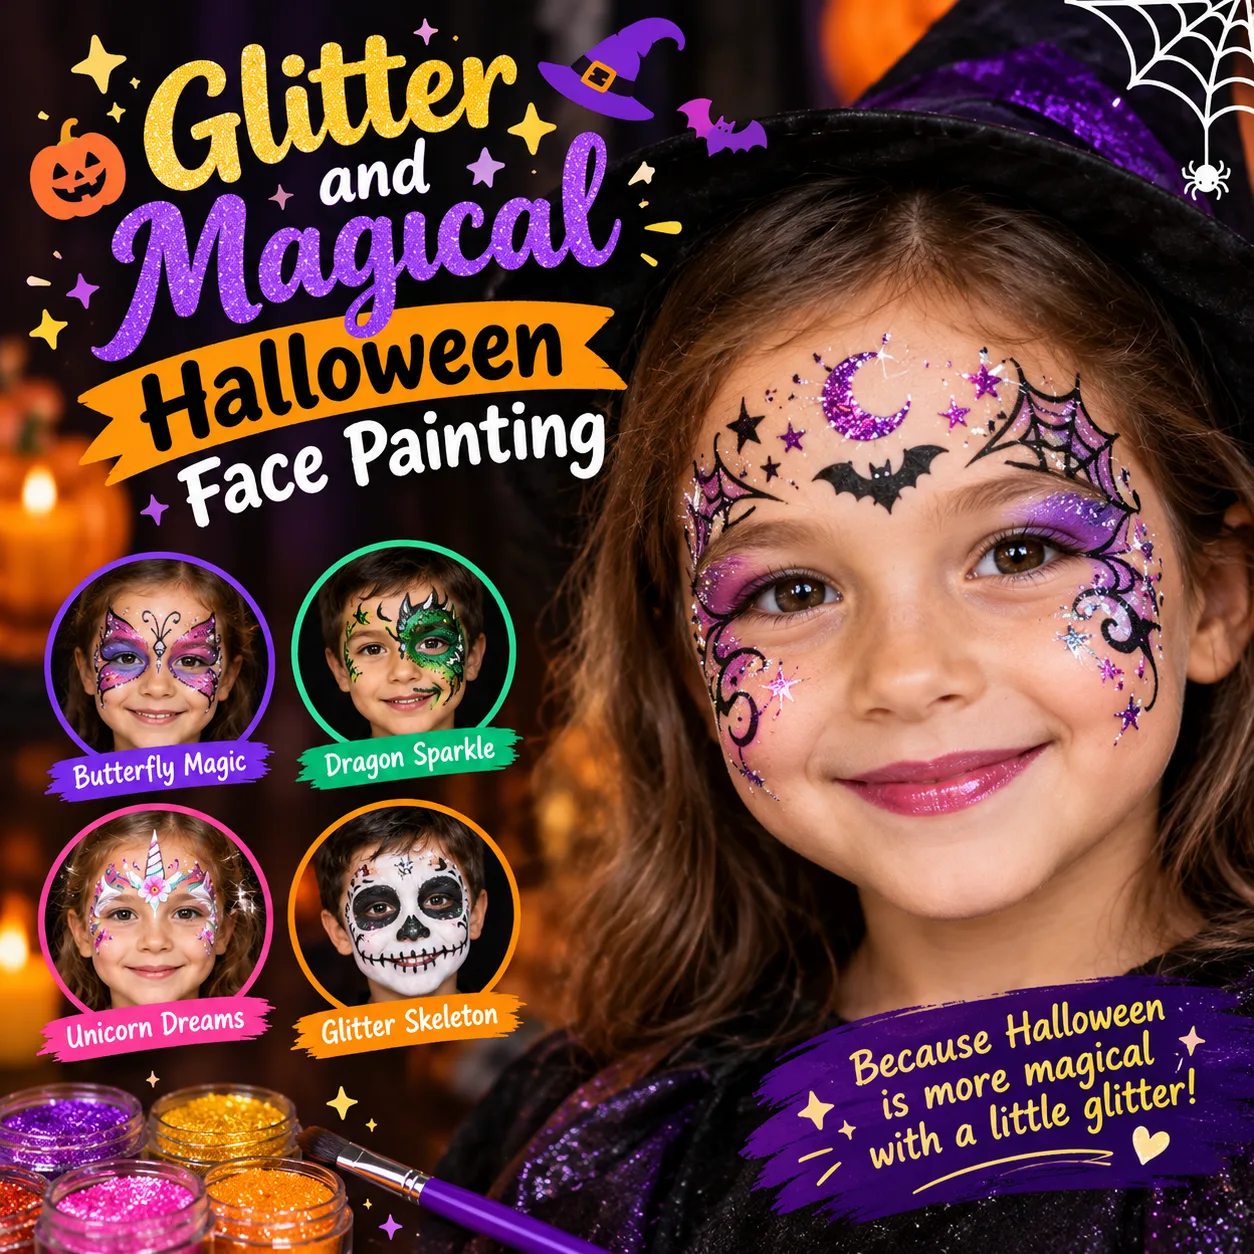
Not every Halloween look needs to be frightening. Glitter-inspired face painting can create a magical appearance that suits fairy costumes, fantasy characters, friendly witches, and children who prefer colourful designs.
Choose a combination of purple, blue, pink, silver, or orange face paint. Create small stars, moons, clouds, or swirling patterns across the cheeks and forehead. You can add decorative dots around the eyes to give the design a festive appearance.
If you want to use glitter, select cosmetic glitter specifically labelled for use on the face. Never use craft glitter near the eyes, because its particles may cause irritation or injury.
For a magical Halloween look, paint a crescent moon on one cheek and add tiny stars around it. Alternatively, create a colourful mask around the eyes using purple and blue shades.
This style is ideal for Halloween parties, school events, and family celebrations where children want to dress up without looking too scary. It can also be combined with butterfly wings, fairy costumes, or fantasy-inspired clothing.
Tips for Creating Beautiful Halloween Face Paint
Choosing the right design is only one part of creating a successful Halloween look. The quality of the products, the preparation of the skin, and the way you apply the paint can all affect the final result.
First, use face paints specifically formulated for cosmetic use. Ordinary craft paints, poster colours, acrylic paints, and other non-cosmetic products should never be applied to the skin. Check product labels and follow the manufacturer’s instructions.
Before applying face paint, clean the skin gently and allow it to dry. If you are using a product for the first time, perform a patch test according to its instructions and check for signs of irritation. Avoid painting over broken, irritated, or inflamed skin.
Use a damp sponge to apply broad areas of colour and small brushes for fine details. A thin brush is useful for whiskers, spiderwebs, teeth lines, and decorative patterns. Build up the design gradually instead of applying too much paint at once.
Keep the area around the eyes and mouth in mind when selecting a design. Use only products approved for those areas, and follow all label restrictions. Do not apply paint to the waterline or directly inside the mouth.
For children’s Halloween face painting, choose a design that matches their patience and comfort level. Simple pumpkins, ghosts, cats, and small bats are usually easier to complete than full-face skulls or zombies. Take breaks if a child becomes uncomfortable.
It is also helpful to practise the design on paper before applying it to the face. This gives you an opportunity to plan the shapes and colours without worrying about making mistakes. Keep tissues, clean water, and spare brushes nearby so you can make small corrections when necessary.
After Halloween, remove the paint using the method recommended by the manufacturer. Wash gently and avoid scrubbing the skin. If irritation occurs, stop using the product and remove it as directed.
Conclusion
Halloween face painting is a fun way to express creativity and complete a costume without spending a fortune on elaborate accessories. Whether you choose a classic pumpkin, a cute ghost, a scary skull, a mysterious vampire, or a colourful butterfly, the right design can make your Halloween celebration more memorable.
Beginners can start with simple shapes and a few basic colours, while experienced artists can experiment with shading, detailed patterns, and half-face designs. Children often enjoy friendly characters and colourful artwork, whereas teenagers and adults may prefer dramatic horror makeup or artistic effects.
Remember to choose skin-safe face paints, follow product instructions, and keep the design comfortable for the person wearing it. With a little preparation and imagination, you can create a Halloween look that is both creative and enjoyable.
Try one of these Halloween face painting ideas for your next celebration, and make your costume stand out with a design that reflects your personality.
Frequently Asked Questions About Halloween Face Painting Ideas
1. What are the easiest Halloween face painting ideas for beginners?
Pumpkins, ghosts, cats, bats, and small spiderwebs are among the easiest Halloween face painting ideas for beginners. These designs use simple shapes and basic colours, so you can create an attractive result without advanced artistic skills.
2. What Halloween face paint designs are best for kids?
Friendly pumpkins, cute ghosts, cats, butterflies, small bats, and simple skeletons are excellent choices for children. Select a design based on the child’s age, comfort level, and preference for cute or spooky characters.
3. What supplies do I need for Halloween face painting?
You will generally need cosmetic face paints, a soft sponge, fine brushes, a cup of clean water if required by the product, and tissues for small corrections. Optional accessories include cosmetic glitter approved for facial use and skin-safe setting products.
4. Can I use regular paint for Halloween face painting?
No. Acrylic paint, poster paint, craft paint, and other products not formulated for skin should not be used as face paint. Choose cosmetic products specifically intended for facial application and follow the manufacturer’s directions.
5. How can I make Halloween face paint last longer?
Start with clean, dry skin and apply the face paint according to the manufacturer’s instructions. Use thin layers when appropriate, allow each layer to dry, and avoid rubbing the painted areas. Only use a setting product if it is suitable for the face paint and the intended skin area.
6. How do I remove Halloween face paint safely?
Use the removal method recommended on the product label. Depending on the formula, this may involve water and a gentle cleanser or a suitable makeup remover. Avoid aggressive scrubbing, and stop if the skin becomes irritated.
7. Which Halloween face painting ideas are suitable for adults?
Adults can try skulls, vampires, zombies, witches, spiderwebs, half-face designs, and dramatic black cat makeup. These styles can be customised with shading, fine lines, and additional details to complement a Halloween costume.
8. Is Halloween face painting safe for sensitive skin?
It depends on the individual and the product. Choose cosmetic face paints suitable for your skin type, read the ingredients, and follow the manufacturer’s patch-testing instructions. Avoid products that have caused previous reactions, and do not apply paint to irritated or broken skin.
9. Can I create Halloween face painting designs without professional skills?
Yes. Many Halloween designs can be created at home with a sponge, a few brushes, and two or three colours. Start with simple shapes, practise on paper, and gradually add details as your confidence improves.
10. What colours are most popular for Halloween face painting?
Black, white, orange, purple, green, red, and grey are popular Halloween face paint colours. Orange and black work well for pumpkins and bats, while white and black are useful for skulls and skeletons. Purple and green are excellent for witches and magical designs.

Founder of Fashion Design Ideas.